If you picked up a Blooming Acres grow bag and are trying to figure out what to do with it today, here's the honest situation: 'Blooming Acres' shows up in a couple of different gardening contexts, most commonly as a mushroom cultivation grow bag (a 5-pound all-in-one substrate bag for growing mushrooms at home) and occasionally as a brand name tied to flower farming or burlap-style hanging planters. Because the name gets used loosely, the instructions below cover the most practical interpretation: a fabric or burlap-style grow bag for vegetables, herbs, or flowers, with a dedicated section for mushroom grow bag users who may have landed here too. Read through, find your version, and follow from there.
Blooming Acres Grow Bag Instructions: Setup to Troubleshooting
Marcus Thornfield
24 Mar 2026
What Blooming Acres grow bags are and what they're for
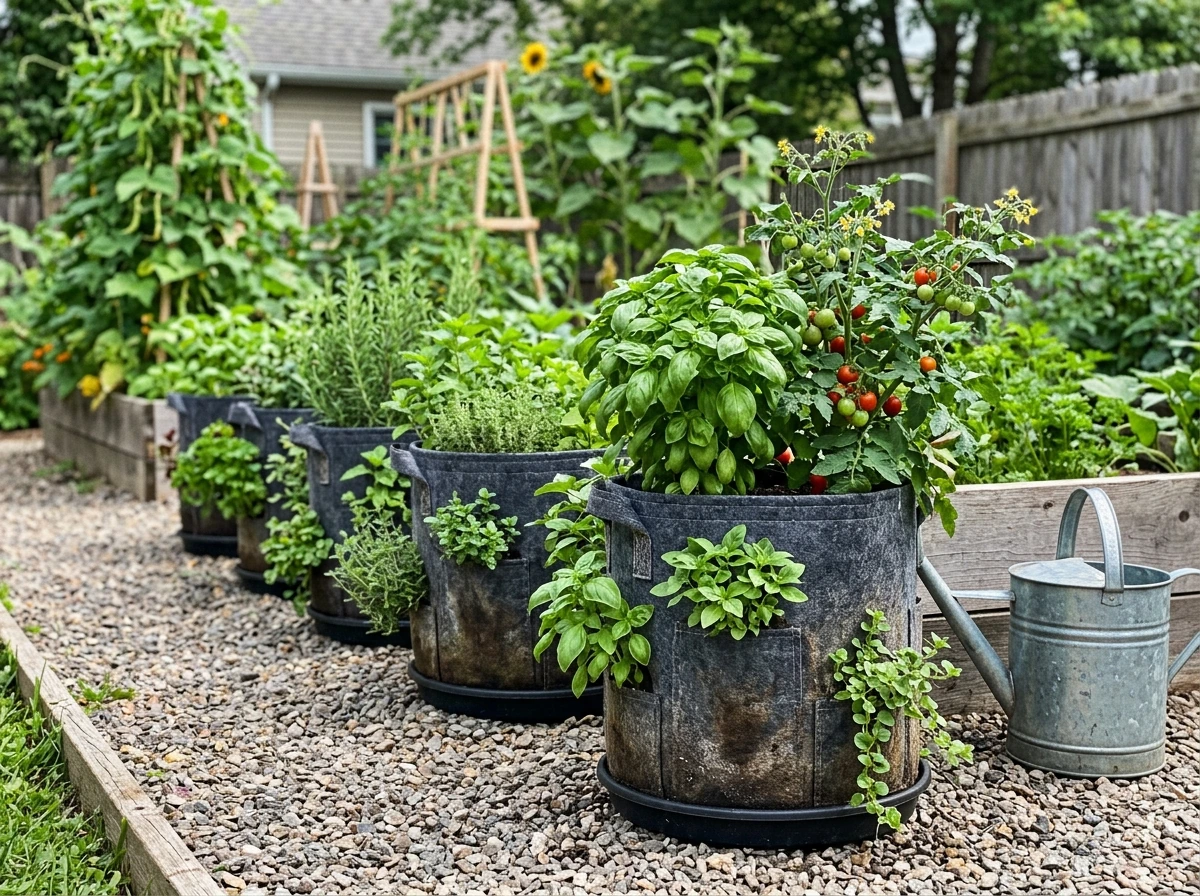
Grow bags in the Blooming Acres style are portable, soil-filled containers designed to let you grow plants almost anywhere without needing raised beds or in-ground planting. The most commonly referenced version is a burlap or fabric bag with 1-inch side holes for drainage and airflow, holding roughly 6 to 8 quarts of growing medium. That's enough room for herbs, compact vegetables like lettuce, spinach, or bush beans, and smaller flowering plants. They work especially well on patios, balconies, driveways, and any hard surface where you want a low-effort seasonal garden.
The side holes are a key feature. They serve double duty: excess water drains out so roots don't sit in soggy soil, and the holes allow air to reach the root zone, which actually encourages healthier, more compact root growth than solid-walled containers. If your bag looks like a hanging version with a hook or rope loop at the top, it's designed to be wall-mounted or hung from a fence, which means drainage happens naturally downward and outward through those holes.
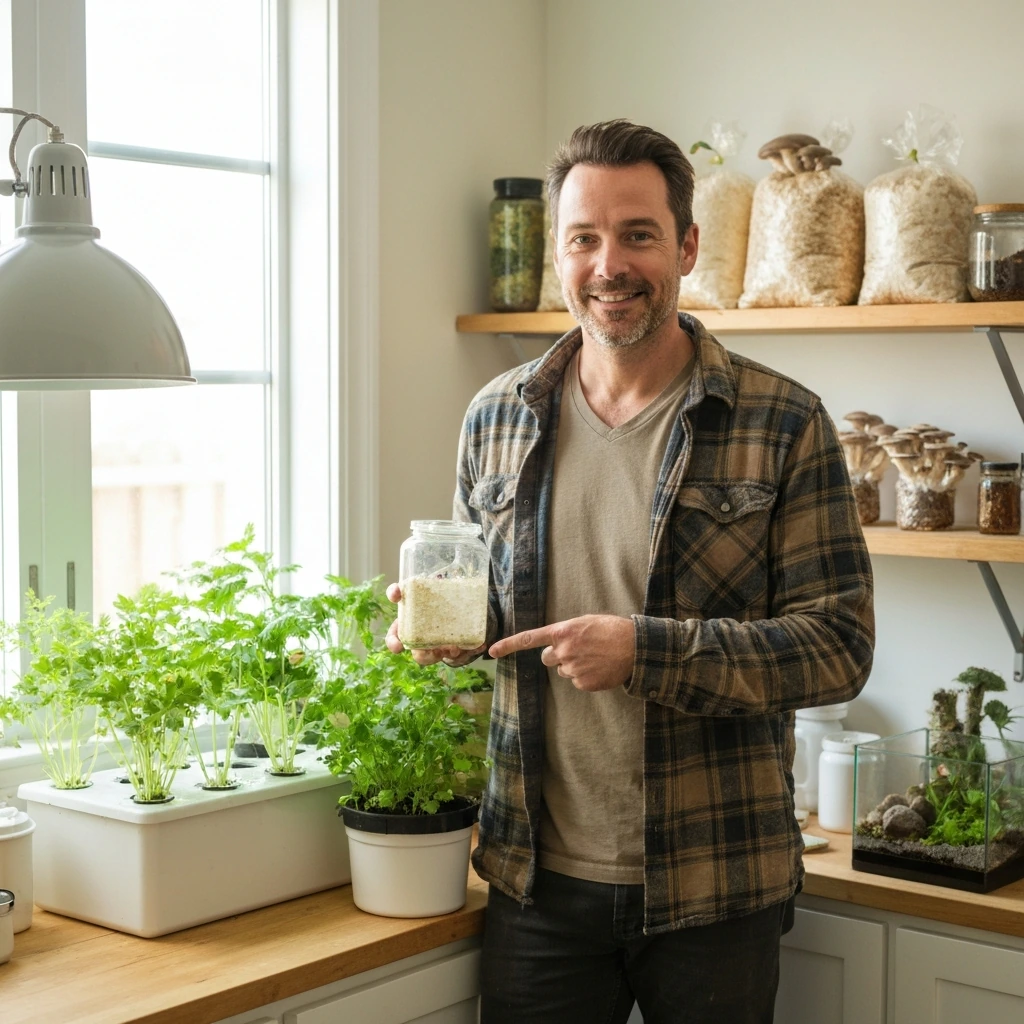
A quick note for mushroom growers: if you found this page searching for a Blooming Acres 5-pound mushroom grow bag (sometimes called an AIO or all-in-one bag), the basic setup process is meaningfully different from vegetable growing. I'll cover mushroom-specific steps in the planting and troubleshooting sections so you're not lost. If you're using that type of bag, you may also find the all-in-one mushroom grow bag instructions article on this site useful for a more detailed deep-dive. spore sorcery grow bag instructions. north spore grow bag instructions. magic grow bag instructions
Before you start: supplies, setup location, and bag prep
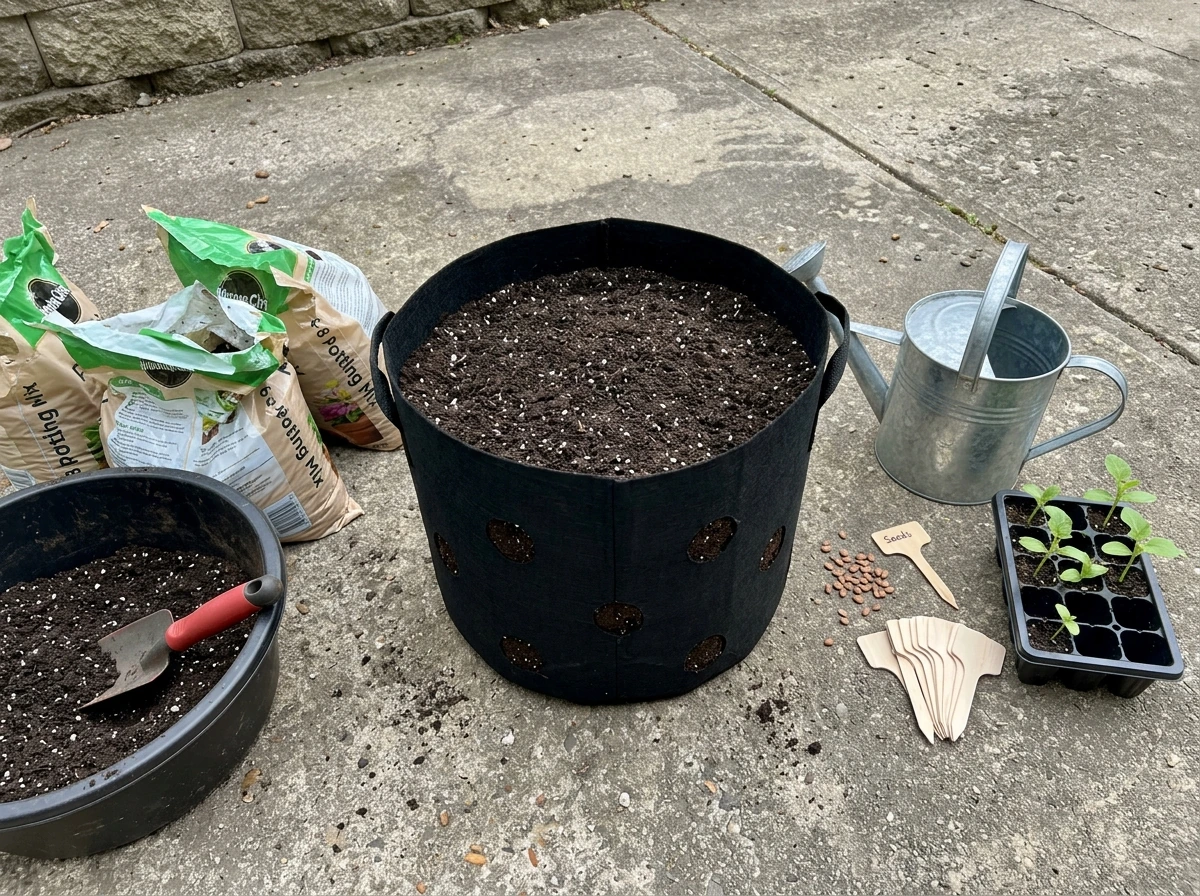
The bag itself is just the container. Before you plant anything, gather these supplies so you're not stopping mid-setup:
- 6 to 8 quarts of potting mix (not garden soil, which compacts too much in bags)
- Seeds or transplant seedlings for your chosen crop
- A slow-release granular fertilizer or liquid feed (more on this below)
- A watering can with a gentle rose head, or a spray bottle for smaller bags
- Optional: a saucer or drip tray if you're placing the bag on a deck or indoor surface
- Optional: bamboo stakes or small tomato cage if growing anything that climbs or flops
For soil, a standard all-purpose potting mix works well. If you can find one with perlite already mixed in, that's a bonus because it improves drainage through those side holes. Avoid dense, heavy mixes labeled for raised beds or garden beds; they hold too much moisture and can lead to root rot in a confined bag. Fill the bag to about 1 to 2 inches below the rim so you have room to water without overflow washing soil out of the top.
Location matters more than most people expect. Blooming Acres-style grow bags are thin-walled, which means the soil heats up fast in direct sun. For heat-sensitive crops like lettuce or herbs such as cilantro and parsley, a spot with morning sun and afternoon shade is ideal. For tomatoes, peppers, or sun-loving flowers, go for at least 6 full hours of direct sunlight. If you're hanging the bag on a fence or wall, check that the mounting hardware (hook, nail, or bracket) can hold a fully watered bag, which can weigh 10 to 15 pounds depending on size.
Before adding soil, check the side holes aren't blocked or folded shut. Lay the bag flat and press lightly around the perimeter to open any holes that got creased during shipping. If the bag is the hanging type, hang it first and then fill it so you're not trying to lift a heavy bag into position after the fact.
Planting guide: seeds, transplants, and spacing
You have two approaches here: starting from seed directly in the bag, or transplanting a seedling you already started (or bought). Both work, but they have different timing and setup requirements.
Starting from seed
For bags with side holes, some growers plant seeds directly into those holes as the primary planting point, tucking a small plug of soil and seed right into the opening. This works well for trailing or spreading plants like strawberries, herbs, and compact flowers. For top-planting from seed, press seeds into the filled soil at the depth listed on the seed packet (usually two to three times the width of the seed), water gently, and keep the soil moist but not saturated until germination. Most herbs and greens germinate in 5 to 14 days in a warm spot.
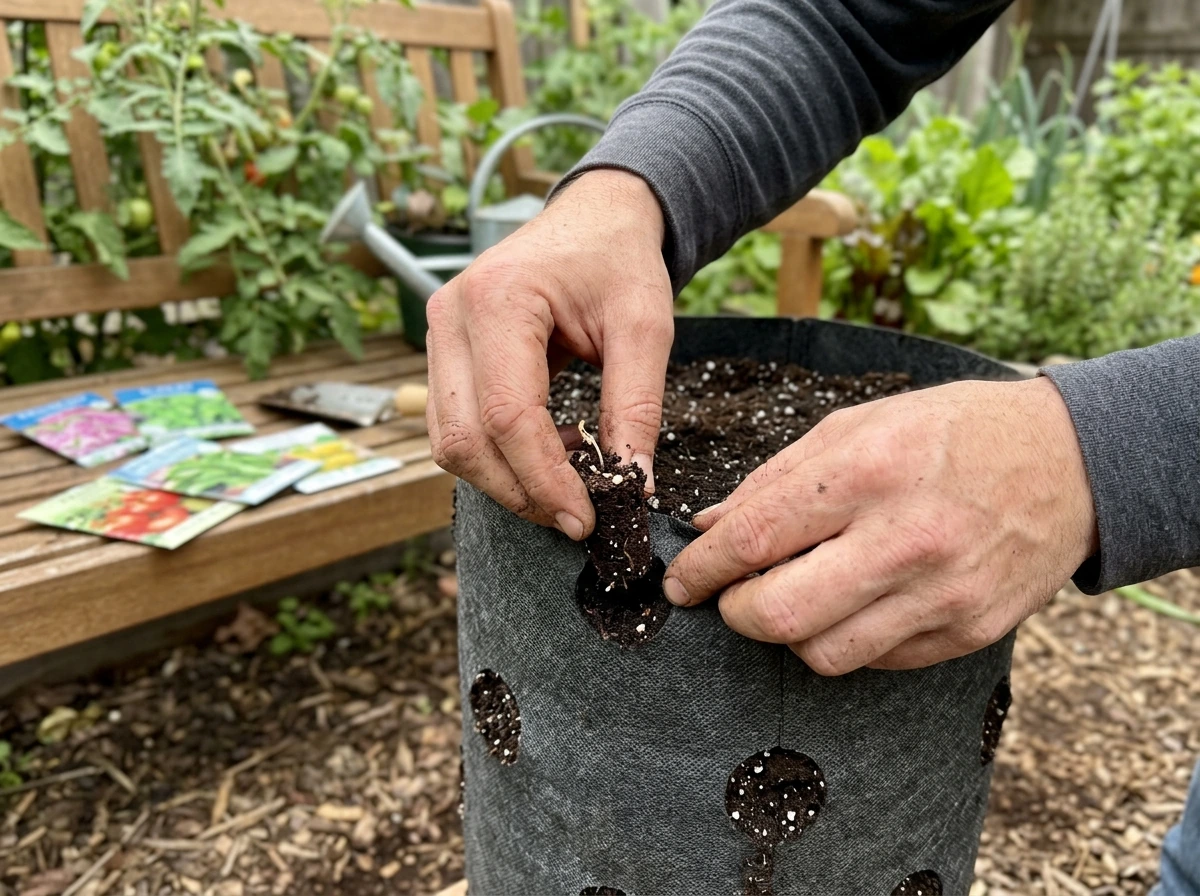
Using transplants
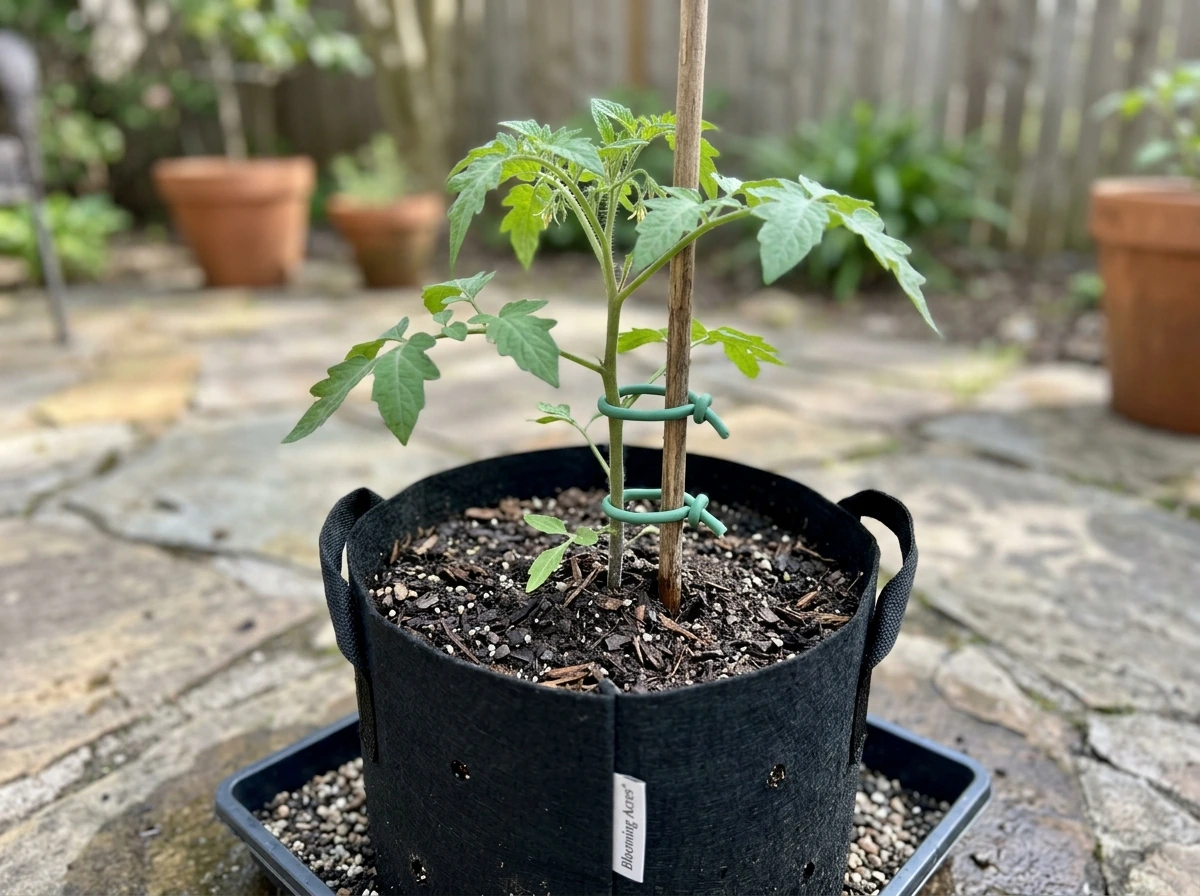
Transplants are the faster, more forgiving option for beginners. Dig a hole in the filled bag slightly larger than the root ball, set the plant at the same depth it was growing in its nursery pot, firm the soil around it, and water immediately. For a 6 to 8 quart bag, one to two transplants is typically the right number. Crowding plants in a small bag is one of the most common mistakes: it leads to competition for water and nutrients, and neither plant thrives.
Spacing guidelines by crop type
| Crop Type | Plants per 6-8 qt Bag | Notes |
|---|---|---|
| Herbs (basil, parsley, cilantro) | 1 to 2 | Trim regularly to prevent bolting |
| Lettuce or spinach | 2 to 3 | Cut-and-come-again works well |
| Bush beans | 2 to 3 seeds | Thin to 2 plants after germination |
| Compact flowers (marigolds, pansies) | 1 to 2 | Deadhead for continuous blooms |
| Peppers (compact variety) | 1 | May need a small stake |
| Tomatoes (cherry or patio type only) | 1 | Requires sturdy support |
For mushroom grow bag users: the planting process is completely different. You're inoculating a pre-colonized or sterilized substrate bag with spores or liquid culture, not planting seeds. Inoculate through the self-healing injection port (if your bag has one) or by flame-sterilizing a needle and injecting through the bag wall. After inoculation, keep the bag at 70 to 75 degrees Fahrenheit in a dark location until you see full white mycelium colonization, which typically takes 2 to 4 weeks depending on your mushroom species. Once colonized, you'll do a 'break and shake' (massaging the bag to redistribute mycelium) before moving it to fruiting conditions.
Watering and drainage: how to get it right
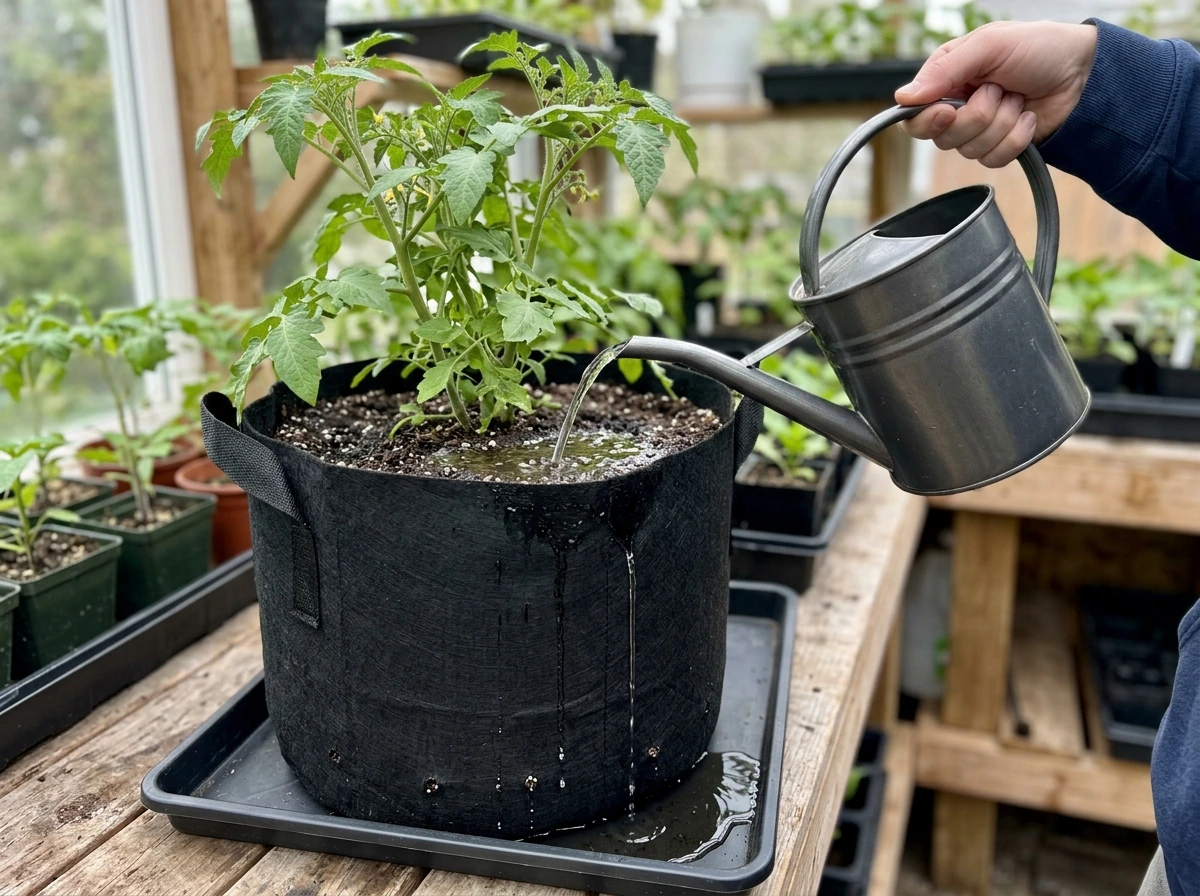
Watering is where most grow bag problems start. The side holes in a Blooming Acres-style bag mean water drains faster than in a solid pot, which is good for root health but also means you need to water more frequently than you would with a traditional container. In warm weather, plan to check soil moisture daily. A simple finger test works fine: push your finger about an inch into the soil near the bag's center. If it's dry at that depth, water thoroughly.
When you water, go slowly and evenly around the top of the bag rather than dumping water in one spot. The goal is to wet the entire soil column, not just the top layer. Water until you see moisture starting to seep from the side holes or drip from the bottom. That tells you the soil is fully saturated and excess is draining out, which is exactly what you want.
For hanging bags, use a watering can with a gentle rose head and water in two passes: once to wet the surface, wait 30 seconds, then go around again. This prevents water from channeling straight through without being absorbed. Avoid power sprayers or hose nozzles set to jet mode because that pressure can blast soil out of the top holes or side openings.
In cooler weather or for shade-grown herbs, you may only need to water every two to three days. In summer heat, especially for bags mounted on a south-facing wall that gets reflected heat, once-a-day watering might not be enough. Lightweight bags that feel almost empty when you lift or tip them slightly are usually underwatered.
Feeding and soil care: what to fertilize and when
Potting mix comes with a limited nutrient charge, usually enough for about four to six weeks of growth. After that, you need to supplement. For most vegetables and herbs in a grow bag, a balanced liquid fertilizer with roughly equal NPK numbers (like a 10-10-10 or similar) works well and is easy to apply at watering time. Mix according to the label, but start at half strength for the first two applications to avoid burning roots in the confined space.
Alternatively, you can mix a slow-release granular fertilizer into the potting mix before planting. A half tablespoon per quart of soil is a reasonable starting point for most all-purpose granular products. This method is lower maintenance because nutrients release gradually with each watering, and you won't need to think about feeding for 6 to 8 weeks.
For flowering plants specifically, once buds start forming, switch to a fertilizer with a higher middle number (the phosphorus number, like 5-10-5 or 10-30-10). Phosphorus supports flower and fruit development. For leafy herbs and greens, stick with a balanced or slightly nitrogen-forward formula throughout the season since you want leaf growth, not flowers.
One thing to watch with frequent watering: nutrients flush out of the bag faster than in larger containers. If your plant looks pale or yellow after several weeks despite regular watering, nutrient depletion is often the cause. In that case, resume liquid feeding once a week and you should see improvement within 7 to 10 days.
Ongoing maintenance: support, pruning, pests, and disease
Most crops suited to a small grow bag are low-maintenance, but a few habits will make the difference between a bag that thrives and one that struggles halfway through the season.
Staking and support
Compact herbs and flowers usually don't need support. But if you're growing a cherry tomato, a pepper plant, or any vining flower, add a stake or small cage early, before the plant needs it. Trying to add support after a plant has flopped over or after roots are fully established risks snapping stems or disturbing the root ball in the bag's limited soil volume.
Pruning and deadheading
For herbs like basil, pinch off flower buds as soon as you see them. Once basil bolts (goes to flower), the leaves become bitter and growth slows. Pinching the top two sets of leaves every week or two actually makes the plant bushier and more productive. For flowering plants like marigolds and pansies, deadheading (removing spent blooms) keeps the plant producing new flowers instead of putting energy into seed formation.
Pest and disease checks
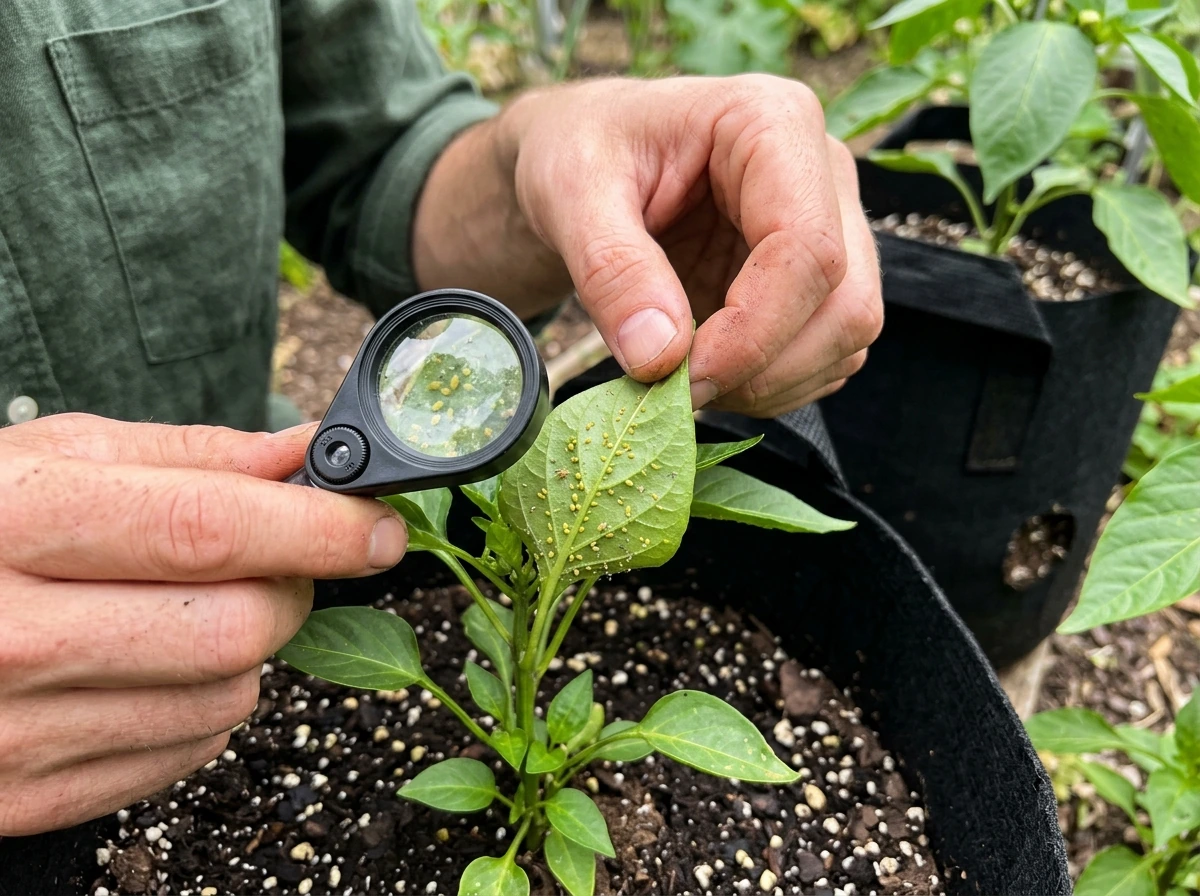
Check the undersides of leaves weekly. Aphids, spider mites, and whiteflies tend to cluster there before they become visible on top. A quick blast of water from the hose knocks off most soft-bodied insects. For persistent infestations, a diluted neem oil spray (about 2 teaspoons per quart of water with a drop of dish soap) applied in the evening is effective and safe for edible crops. Avoid spraying in direct midday sun because it can burn leaves.
Fungal issues like powdery mildew show up as white or gray powdery patches on leaves, usually when air circulation is poor or plants are overcrowded. If you see it, remove the affected leaves immediately, improve spacing, and avoid wetting the foliage when you water. Mold on the soil surface itself usually means the bag isn't draining well enough or is sitting in a spot with no airflow.
Troubleshooting common problems and what to do today
If something looks wrong with your grow bag right now, start here. Most problems come down to watering, drainage, or nutrition. Use the table below to diagnose fast, then follow the fix.
| Problem | Most Likely Cause | What to Do Now |
|---|---|---|
| Yellowing leaves | Overwatering or nutrient depletion | Check soil moisture first. If soggy, let it dry out. If dry, start liquid feeding. |
| Wilting despite watering | Root rot from poor drainage or heat stress | Check side holes are open. Move bag out of direct afternoon sun temporarily. |
| Bag not draining | Side holes blocked or soil too dense | Unblock holes with a toothpick. Mix in perlite if repotting is possible. |
| Soil washing out of holes | Water pressure too high or watering too fast | Switch to a gentle rose-head can. Water in slow, even passes. |
| Slow or no growth | Insufficient light or nutrients | Count actual sunlight hours. Add liquid fertilizer at half strength. |
| Mold on soil surface | Overwatering plus poor airflow | Let soil dry out. Move bag to a spot with better air circulation. |
| White webbing under leaves | Spider mites (common in hot, dry conditions) | Spray undersides of leaves with neem oil solution in the evening. |
| Bag smells bad | Rotting roots from waterlogged soil | Remove plant, dump soil, rinse bag, and restart with fresh mix and better drainage. |
| Mushroom bag not colonizing | Too cold, contamination, or poor inoculation | Confirm temp is 70-75°F. Look for green/black patches indicating contamination. |
When you're not sure what's wrong, always check watering first. The majority of grow bag failures trace back to either too much or too little water, and it's the easiest thing to fix. If the soil is soggy, stop watering and give it 48 hours. If it's bone dry and the plant is wilting, water slowly and deeply right now, then reassess your daily watering schedule.
For mushroom grow bags specifically: if you see green, black, or orange patches in the bag, that's contamination and the bag is a loss. Don't open it indoors. Seal it in a garbage bag and dispose of it outside. Contamination in mushroom bags usually comes from a non-sterile injection or working in an environment with too much ambient mold. Your other bags in the same batch are probably fine as long as you were careful.
Harvest, end-of-season steps, and next-cycle tips
Knowing when and how to harvest depends on what you're growing, but the general rule is: harvest early and often. For herbs, take no more than a third of the plant at once. For lettuces and greens, snip outer leaves and leave the center growing. For fruiting crops like peppers and tomatoes, pick as soon as they're ripe and don't let fruits linger on the plant; it slows down new fruit production.
At the end of the season, or when your crop is finished, here's how to wrap up and set yourself up well for next time:
- Remove all plant material, including roots, from the bag.
- Dump the used soil into your compost or garden bed. Don't reuse it straight from the bag next season as it will be nutrient-depleted and possibly harboring disease.
- Rinse the bag with a diluted bleach solution (1 tablespoon of bleach per gallon of water) or white vinegar, scrub lightly, and let it air-dry completely before storing.
- Inspect the bag for tears, holes that have stretched too large, or fabric breakdown. Small tears can be patched with iron-on fabric patches; large ones mean it's time for a new bag.
- Store the dry bag flat or folded in a cool, dry place out of UV light. Extended sun exposure degrades fabric grow bags quickly.
- For next season, start with fresh potting mix and consider mixing in a slow-release fertilizer before planting so you're not trying to remember your fertilizing schedule mid-season.
For mushroom grow bags, end-of-cycle steps are simpler: once fruiting is complete and the block stops producing new pins (baby mushrooms), the spent substrate can go directly into a compost pile. Some growers get a second flush by rehydrating a spent block with a 12-hour cold water soak, then returning it to fruiting conditions. It's worth trying before composting, especially if your first flush was small.
If this is your first successful grow bag season, you're in a good position to scale up. Try adding a second or third bag next cycle with different crops to experiment with spacing and variety performance. Grow bags are forgiving tools to learn with, and each cycle gives you much better instincts for watering and feeding than any instruction sheet can. Other bag-based growing guides on this site, including ones for mushroom grow bag setups and specialty kits, can help you branch out once you've got the basics locked in.
FAQ
My Blooming Acres grow bag arrived folded or the holes look creased, should I cut anything open or just reopen the holes by hand?
Just reopen the existing holes, do not cut new ones unless the manufacturer indicates you can. Lay the bag flat, gently press around each hole to restore airflow, then run a quick drainage check by filling the bag halfway with water and watching for side-hole seepage. If water pools in the center for more than a few minutes, the holes may be blocked or the bag lining is folded, and you should fix that before planting.
How much potting mix should I add if my bag is smaller or larger than the typical 6 to 8 quart size?
Fill to 1 to 2 inches below the rim so you can water without washing soil out, then confirm by watering once and checking how quickly it drains. As a rule of thumb, you want enough depth for an inch of soil near the bag center to dry between waterings (so the finger test works reliably), not so little that it dries out within a day in warm weather.
Can I reuse the potting mix from one season to the next in a Blooming Acres grow bag?
You can reuse it, but plan on refreshing it. Mix old media with compost and add a slow-release fertilizer, and expect reduced vigor because nutrients and structure degrade after 4 to 8 weeks of watering and plant uptake. For best results, many gardeners start with fresh mix for vegetables and herbs, then reuse only for less demanding plants like flowers.
What’s the best way to tell whether I’m underwatering versus overwatering in a side-hole grow bag?
Overwatering usually shows as consistently wet soil at the finger test depth, yellowing leaves paired with limp growth, and sometimes a musty soil smell. Underwatering shows as dry soil at the 1-inch depth with wilting that improves after a thorough soak. If you see both extremes across the bag, rotate the bag every 3 to 5 days so sunlight and heat exposure do not create uneven drying.
Do I need to add a tray under the grow bag when it drains through the side holes?
If you are on a patio, balcony, or any surface that can stain, use a catch tray or set the bag over a removable drip mat. Avoid sealing drainage into a fully closed container, because the side holes still need airflow and outward drainage. For hanging bags, check that the mounting can handle the extra weight when fully watered, roughly 10 to 15 pounds for a typical size.
How often should I fertilize, and how do I avoid burning plants when the bag nutrients flush fast?
Start with half strength for the first two liquid feedings, then move to label strength once plants are actively growing. If leaf tips brown or growth stalls while soil is moist, pause feeding for 7 to 10 days and flush with plain water once (water slowly until excess drains out). This prevents fertilizer salts from concentrating in the confined bag.
Can I plant more densely than the article recommends if I’m using stronger fertilizer?
In most Blooming Acres-style bags, higher density still causes competition for moisture because the soil volume per plant is the limiting factor. Stronger fertilizer does not fix that, it can worsen stress by increasing salt concentration. Stick to one to two transplants per typical 6 to 8 quart bag, and if you want multiple plants, choose smaller varieties or spread them using the side holes as separate planting points.
My vegetable leaves have spots and I’m not sure if it’s insects or fungus. What should I check first?
Start by checking undersides for clusters of pests, and check whether the plant is staying wet for long periods. Fungus risk increases if foliage stays damp overnight or plants are too crowded, so improve airflow and water at the soil level rather than wetting leaves. If you see webbing or tiny moving insects, treat for pests first, because fixing watering alone may not stop an infestation.
For hanging grow bags, is watering from the top always enough?
Top watering works best when you water in two passes, letting the first soak in before the second. If the bag is very windy or sun-exposed, water can channel and run out quickly, leaving the center dry. In that case, lift or tilt the bag gently to assess weight, then rewater slowly until side holes show seepage or bottom runoff indicates the full column is wet.
I accidentally planted the wrong type of Blooming Acres grow bag (vegetable-style versus mushroom AIO). Can I convert it?
Do not convert a mushroom bag into a vegetable grow bag by adding soil. Mushroom AIO bags are sterilized for a different purpose, and opening or changing them can increase contamination risk and lead to failed mushroom cycles. If you want to grow vegetables, use a vegetable-friendly potting mix in a container designed for plant roots, not an inoculation substrate bag.
For mushroom bags, what’s a common early mistake that causes contamination or stalled growth?
A common cause is using non-sterile technique at injection, or working in a space with high ambient mold. Another frequent issue is injecting too deep or disturbing the substrate during handling, which can slow colonization. If your bag shows green, black, or orange patches, treat it as contamination, seal it for disposal outside, and do not open it indoors.
When do I stop watering for harvest timing, especially for leafy greens and herbs?
Do not fully stop watering right before harvest, instead aim for consistent moisture so leaves are crisp and not stressed. For greens, harvest early and then maintain light, even watering for regrowth, especially if you plan to pick outer leaves again. If you wait until soil is very dry, you can get bitter or tough leaves even when the plant looks otherwise healthy.