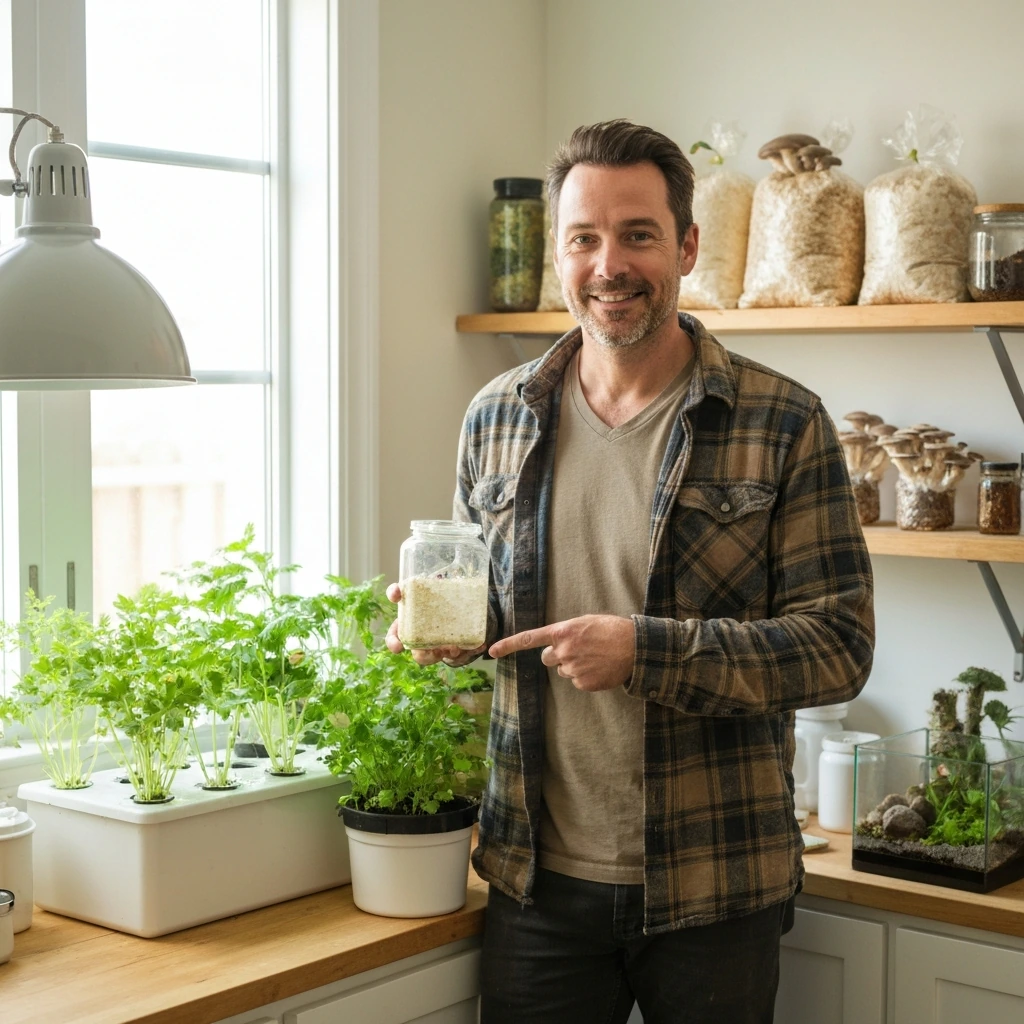
If you just got a Spore Sorcery grow bag and you're staring at it wondering what to do first, here's the short answer: figure out which version you have, then follow the matching steps below. The most common Spore Sorcery bag is the 6 lb Jumbo All-in-One, which comes with sterilized grain and CVG substrate already inside but needs you to add spores. That means you're in the inoculation stage right now, not the fruiting stage. This guide walks you through every stage, start to finish, with troubleshooting built in so you can self-diagnose problems as they come up.
Spore Sorcery Grow Bag Instructions: Setup, Incubate, Troubleshoot
Marcus Thornfield
24 Mar 2026
Which bag do you have and what stage are you in?
Before you do anything else, confirm your bag type. Spore Sorcery's product line includes at least two meaningfully different setups, and the steps are not interchangeable.
| Bag Type | What's Inside | Spores Included? | Your First Step |
|---|---|---|---|
| 6 lb Jumbo All-in-One | Sterilized milo sorghum grain + pasteurized CVG bulk substrate, 0.5-micron filter patch, Microppose self-healing injection port | No | Buy and inject a spore syringe through the injection port |
| Ready-to-Fruit (pre-colonized) | Fully colonized substrate, no inoculation needed | Already done | Skip to fruiting initiation — do NOT open yet |
| Grain-only bag (smaller sizes) | Sterilized grain, no bulk substrate layer | No | Inject spores, colonize, then transfer to bulk or fruit in bag |
Check your bag right now for two things: a small rubber injection port (a circular silicone dot you push a needle through) and a tan or white filter patch on the side of the bag. If you see both, you almost certainly have the All-in-One and you need to inoculate. If the bag is already fully white and fuzzy inside with no visible brown substrate showing, it may be colonized and you're closer to fruiting. When in doubt, treat it as the All-in-One and follow the inoculation steps.
What you need before you start
You don't need a lab, but you do need a clean workspace and a few basics. Contamination is the single biggest reason grows fail, and most contamination happens right at the inoculation step when people rush through setup.
Supplies checklist
- Spore syringe (sold separately — Spore Sorcery explicitly does not include spores)
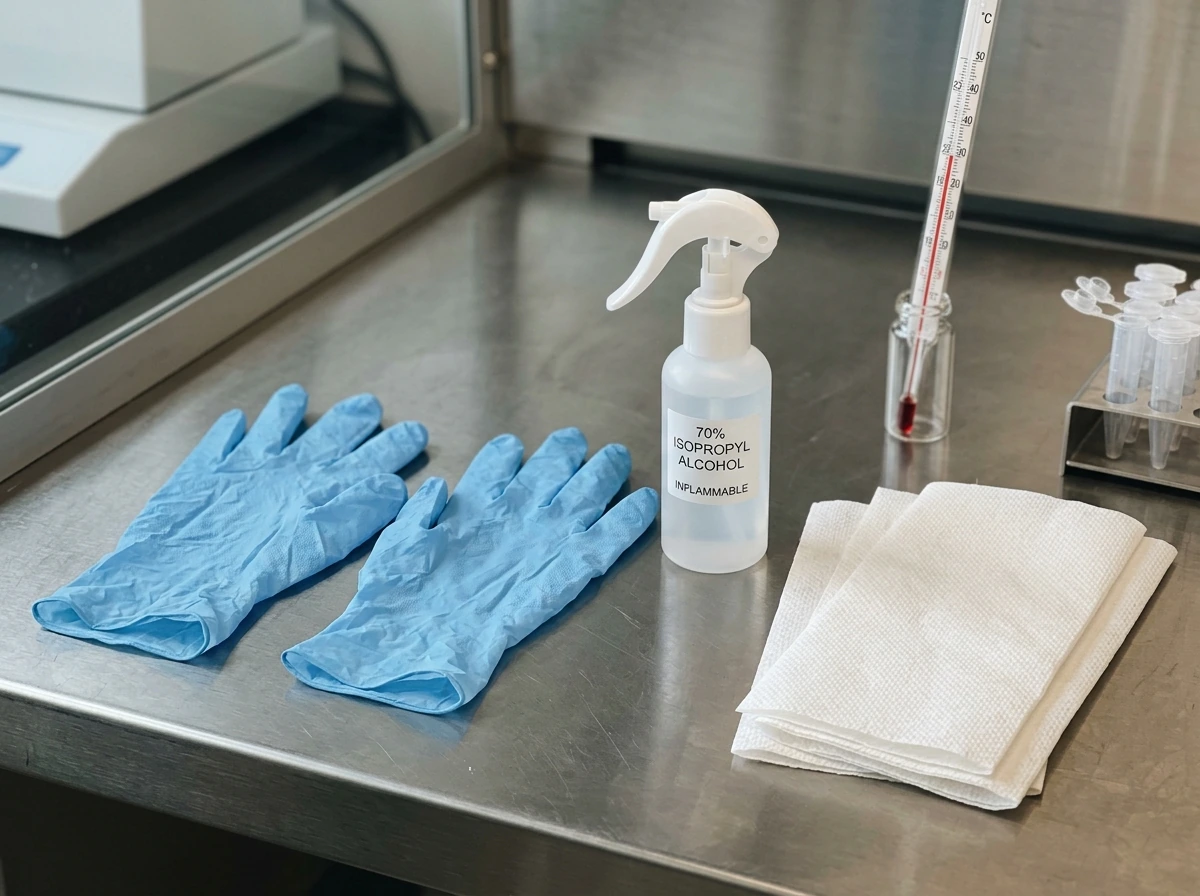
- Isopropyl alcohol, 70% concentration (higher percentages evaporate too fast to be effective)
- Alcohol wipes or a clean cloth soaked in isopropyl
- Lighter or flame source to sterilize your needle tip
- Latex or nitrile gloves
- An optional face mask if you want extra protection
- A spray bottle filled with clean water (for the fruiting stage)
- A thermometer to monitor room temperature
Setting up your workspace
Pick the least drafty spot in your home. Hallways, areas near vents, and spots next to open windows introduce airborne contaminants constantly. A bathroom that hasn't been disturbed for an hour, or a corner of a bedroom with the door closed, works well. Wipe down your work surface with isopropyl alcohol and let it fully dry before you set anything on it. Turn off fans and HVAC units while you're working. The goal is still air for the 5 to 10 minutes it takes to inoculate.
Put on your gloves before you open anything. Wipe the gloves with isopropyl too. It sounds like overkill but your hands carry oils and microbes that can ruin the bag even through incidental contact. This is also the moment to shake your spore syringe for 10 to 15 seconds to distribute the spores evenly before injection.
Inoculating your Spore Sorcery bag: exact steps
The Microppose self-healing injection port on your bag is designed specifically for this. It's a silicone disc that seals itself after the needle is removed, so you don't need tape or additional sealing. The Microppose self-healing injection port on your bag is designed specifically for this. It's a silicone disc that seals itself after the needle is removed, so you don't need tape or additional sealing. Follow these magic grow bag instructions for the exact steps.
- Shake your spore syringe vigorously for 15 seconds to break up any clumps and redistribute the spores.
- Flame-sterilize your needle by holding it in a lighter flame for 3 to 5 seconds until it glows orange, then let it cool for 10 seconds. Do not touch the needle tip.
- Wipe the surface of the injection port on your bag with an alcohol wipe. Let it air dry for 30 seconds.
- Insert the needle straight into the center of the injection port at a 90-degree angle and push through until you feel resistance ease.
- Slowly inject 3 to 5 cc (ml) of spore solution. Most standard spore syringes hold 10 to 12 cc, so you can split one syringe across multiple spots if needed or save the rest for a second bag.
- Withdraw the needle smoothly. The silicone port will reseal on its own.
- Gently massage the outside of the bag to help distribute the spores into the grain layer.
Immediately after inoculation, label the bag with today's date. This sounds minor but it's genuinely useful when you're checking progress two weeks in and can't remember when you started. Store the bag in its incubation spot right away, don't leave it sitting on the counter.
Incubation: where to put it and what to watch for
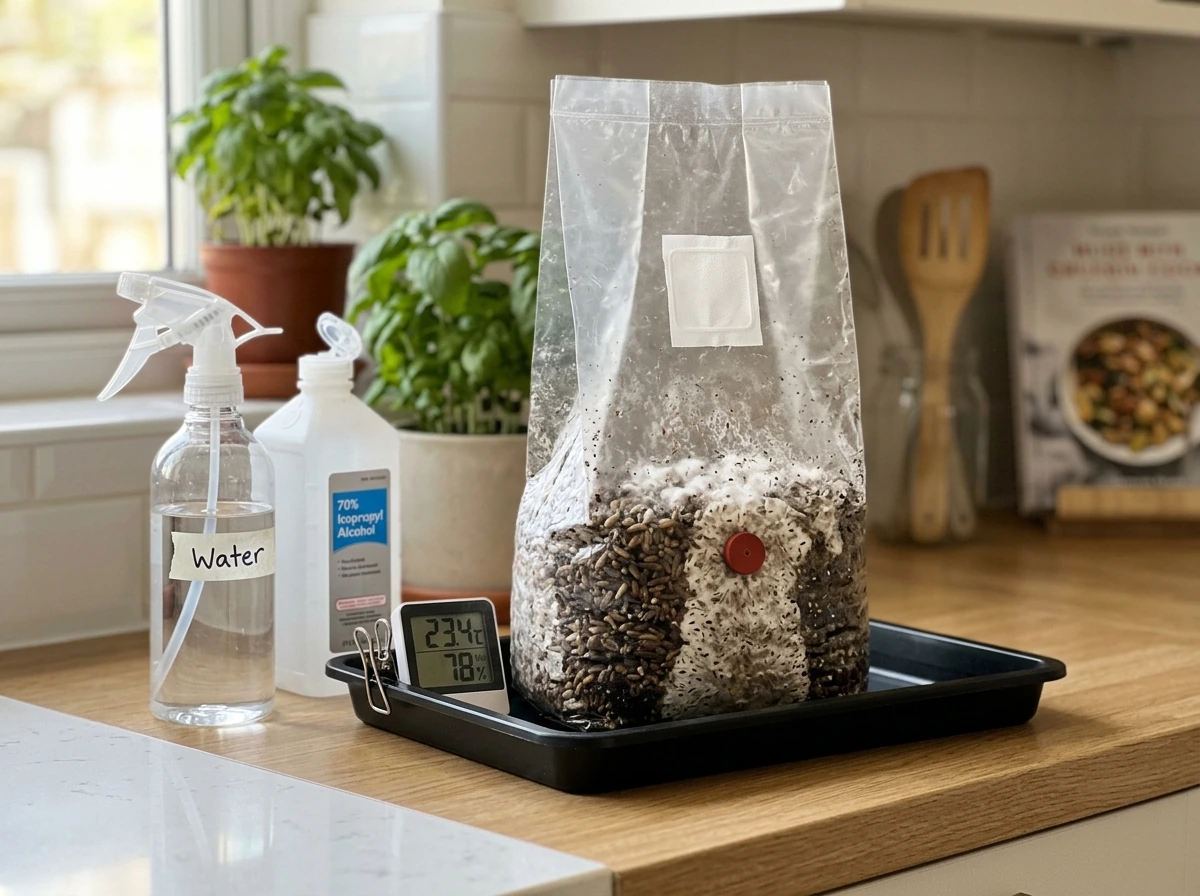
Incubation is the waiting period where mycelium (the white, thread-like fungal network) colonizes the grain and substrate inside your bag. Your job during this stage is mostly hands-off. The bag is sealed, the filter patch handles air exchange automatically, and you're just managing temperature.
Temperature and placement
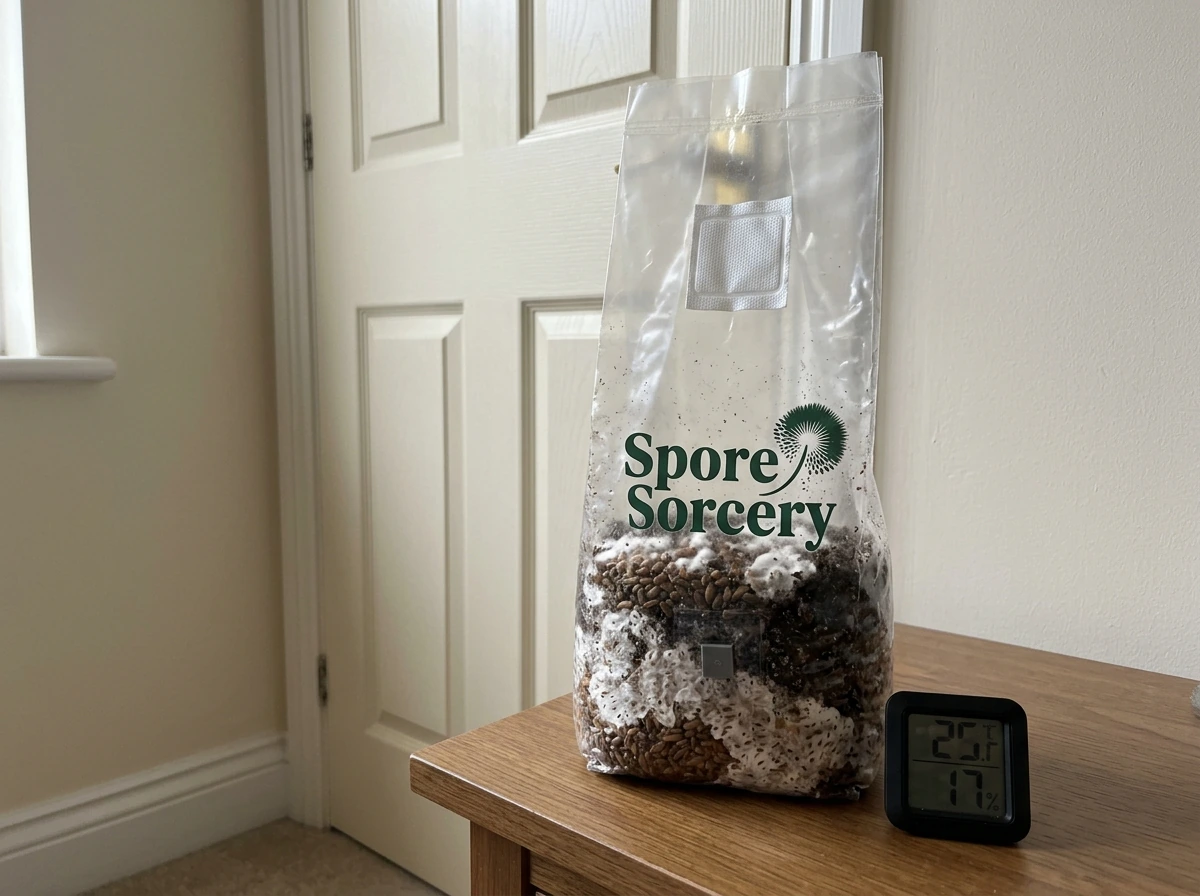
Target a stable temperature between 70°F and 80°F (21°C to 27°C). Most mushroom species colonize fastest in this range. Avoid placing the bag in direct sunlight (it creates heat spikes and also signals the mycelium to start pinning before colonization is complete). A closet shelf, the top of a refrigerator, or a cabinet near a water heater all tend to stay in the right range naturally. If your home runs cooler than 68°F, consider a seedling heat mat set to low placed underneath the bag.
Do not put the bag in a sealed container or bag-within-bag during this stage. The 0.5-micron filter patch on the Spore Sorcery bag is already managing gas exchange. Adding extra sealing will cause CO2 to build up and slow colonization.
Moisture during incubation
You should not need to add any water during incubation. The CVG substrate (coco coir, vermiculite, and gypsum) inside the bag was pasteurized at the right moisture level before packaging. If you see large water droplets pooling at the bottom of the bag, that's a sign of excess moisture, which we'll address in the troubleshooting section. A light misting of condensation on the inside of the bag walls is totally normal and a good sign.
Checking progress
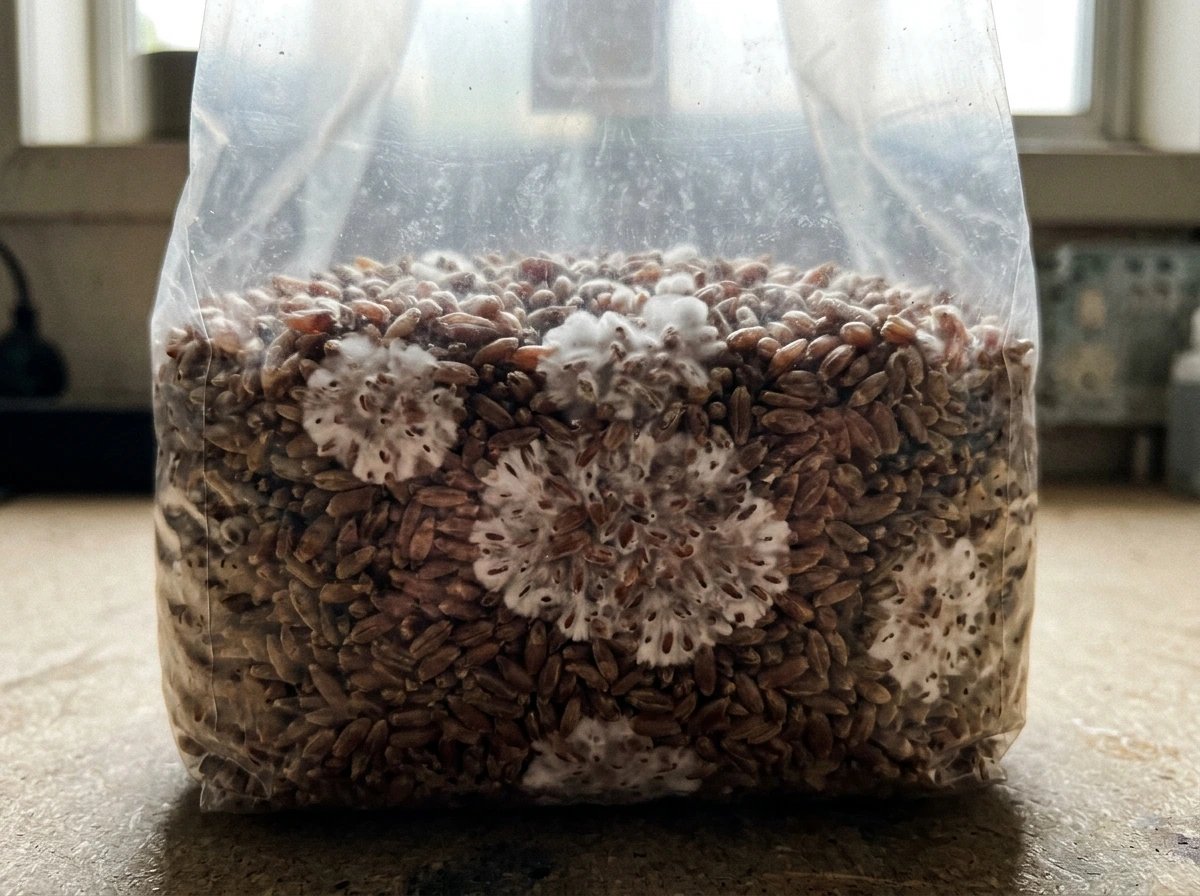
Starting around day 5 to 7 post-inoculation, you should see small white fuzzy patches forming near your injection points. Those are mycelium colonies starting. Over the next 2 to 4 weeks, those patches will expand and eventually merge until the entire bag looks uniformly white. That's full colonization. Do not open the bag during this stage. Do not add water, do not add more spores, and do not poke any holes. Patience here pays off in yield later.
| Days Post-Inoculation | What You Should See | What to Do |
|---|---|---|
| 1 to 5 | No visible change | Nothing — leave it alone |
| 5 to 10 | Small white patches near injection site | Good sign, keep temperature stable |
| 10 to 21 | White spreading outward across grain | Leave undisturbed, check for green/black spots (contamination) |
| 21 to 35 | Bag fully white and firm | Ready to initiate fruiting |
| 35+ | Still patchy or stalled | See troubleshooting section |
Starting the fruiting stage and daily care
Once the bag is 95 to 100% colonized (uniformly white with no remaining brown substrate visible), it's time to switch from incubation mode to fruiting mode. The triggers for fruiting are lower temperature, increased fresh air exchange, and higher surface humidity. You're essentially mimicking what happens in nature when a mushroom underground senses it's time to push to the surface.
Opening the bag

The standard method for the Spore Sorcery All-in-One is to fold down the top of the bag by about 2 to 3 inches to expose the colonized substrate surface, then loosely fold a paper towel or clean cloth over the opening (not airtight, just a dust cover). Some growers cut the top of the bag off entirely at the fold line. Either works. The goal is to allow fresh air to reach the surface while keeping dust and contaminants out.
Fruiting environment
Move the bag to a spot with indirect light and slightly cooler temperatures: 65°F to 75°F (18°C to 24°C) is ideal for most gourmet species. A windowsill that gets ambient daylight but not direct sun works well. Mushrooms don't photosynthesize but they do use light as a directional cue. 6 to 12 hours of ambient light per day is plenty.
Misting and humidity
This is the part of the process that needs the most daily attention. Mist the exposed surface and the inside walls of the bag opening lightly with clean water twice a day, morning and evening. You're aiming to keep the surface visibly moist but not soaking wet. If water is pooling on the surface, you're over-misting. If the surface looks dry and is pulling away from the sides, increase your misting frequency. A light spray of 5 to 8 pumps per session is usually about right.
Fresh air exchange matters here. Gently fan the bag opening with a piece of cardboard for 30 seconds when you mist. This flushes out CO2 that builds up at the surface. High CO2 causes mushrooms to grow long, thin stems with small caps (a condition growers call 'stretching'). Regular fanning prevents this.
Pinning and growth
Within 5 to 14 days of opening and misting, you should see pinheads, tiny mushroom buds about the size of a pencil tip, forming across the surface. At this point, don't disturb the bag. Keep misting, keep fanning, and let them develop. Pins grow into full mushrooms in 5 to 10 days depending on species and conditions. The Spore Sorcery bag is marketed as capable of producing fresh mushrooms in as little as 2 months from start, which lines up with roughly 3 to 4 weeks colonization plus 2 weeks fruiting.
Harvesting and getting more than one flush
The Spore Sorcery 6 lb bag is rated for up to 3 flushes and up to 48 oz of total fresh mushrooms across those flushes. First flushes are usually the biggest. Here's how to harvest properly and set up for follow-up flushes.
When and how to harvest
Harvest just before or as the veil (the thin membrane connecting the cap edge to the stem) starts to tear. Once the veil tears, the mushroom drops spores rapidly and quality drops. The caps should still be slightly curved downward at the edges. To harvest, grip the mushroom at the base of the stem and twist gently while pulling, removing the entire mushroom including the base. Don't leave stubs behind in the substrate because they rot and invite contamination.
Between flushes
After harvesting, remove any remaining stub material and give the surface a good misting. Then fold the bag closed again and let it rest in a cooler spot (60°F to 65°F) for 5 to 7 days. This 'rest and rehydrate' period helps the mycelium recover and accumulate energy for the next flush. After the rest, resume your regular misting and fanning routine and wait for pins to form again. Second and third flushes typically take a few days longer to pin than the first.
After the third flush (or whenever yields drop significantly and the substrate looks dark, shrunken, or contaminated), the bag is spent. At that point you can compost the substrate since the spent CVG and grain makes excellent garden amendment.
When things go wrong: a practical troubleshooting guide
Most problems with grow bags come down to four root causes: contamination, wrong temperature, moisture imbalance, or CO2 buildup. Here's how to identify and fix each one.
Green, black, or pink patches inside the bag

This is contamination, almost certainly mold. Green or blue-green patches are typically Trichoderma, a fast-moving mold that outcompetes mycelium. Black or pink spots may indicate other bacterial or fungal contamination. If the contamination is small (under a quarter-sized spot) and isolated to one corner, some growers try to isolate it by taping or cable-tying off that section of the bag and continuing. Honestly, if the contamination is spreading or covers more than 10% of the bag, cut your losses, seal the bag in a trash bag, and dispose of it. Fighting active contamination rarely works and risks spreading spores into your environment.
Colonization stalled or very slow
If you're past day 21 and less than half the bag shows white mycelium growth, the most common culprits are temperature too low (below 65°F), a bad spore syringe, or a failed inoculation. Check your room temperature first. If it's been below 68°F consistently, move the bag somewhere warmer or add a heat mat. If temperature is fine, the spore syringe may have been old, damaged by heat during shipping, or the needle may not have actually delivered solution into the substrate. You can try a second inoculation through the injection port with a fresh syringe. If nothing appears by day 40, the bag is likely a loss.
Bag looks dry or substrate is pulling away from the sides
This happens during fruiting if misting is inconsistent. If the surface looks pale, cracked, or dry during fruiting, give it a heavier misting (10 to 12 pumps) and fan gently. If the bag has been in a very dry room (under 40% relative humidity), consider placing it inside a larger open plastic bin to trap humidity around it. Do not pour water directly onto the substrate surface, as pooling water invites bacterial contamination.
Standing water at the bottom of the bag
Over-misting or a substrate that was too wet to begin with. Cut back misting to once daily, and if the pooling is significant, carefully tip the bag at a 45-degree angle for a few hours to let the excess drain toward the filter patch. You won't be able to remove it completely, but reducing it helps prevent bacterial rot.
No pins forming despite full colonization
The bag may need a stronger environmental shift to trigger fruiting. Try moving it to a slightly cooler area, increasing fresh air exchange (fan more aggressively and more often), and making sure it's getting some ambient light each day. Some growers introduce a 'cold shock' by placing the colonized bag in the refrigerator for 12 to 24 hours before returning it to fruiting conditions. This mimics the temperature drop mushrooms sense in nature as seasons change.
Low yields or mushrooms with long thin stems and small caps
Long stemmy mushrooms with tiny caps almost always mean CO2 is too high at the surface. You're not fanning enough. Increase fresh air exchange to 3 to 4 times per day and make sure the bag opening isn't too tightly covered. Low overall yield (small total weight across flushes) usually comes down to substrate drying out between flushes or not doing the proper rest period. Make sure you're fully covering the bag and giving it 5 to 7 days of cooler rest before initiating the next flush.
What success actually looks like: a realistic timeline
Here's a realistic week-by-week picture so you can benchmark your own grow and catch problems early. This assumes you inoculated on day 1 with a good spore syringe and are keeping temperatures in the 70°F to 76°F range during incubation.
| Week | What's Happening | Your Role |
|---|---|---|
| Week 1 | Spores germinating, no visible change yet | Leave it alone, check temperature |
| Week 2 | White mycelium patches spreading from injection sites | Watch for contamination, no intervention needed |
| Week 3 to 4 | Full or near-full colonization (bag looks white throughout) | Open bag, begin misting and fanning routine |
| Week 4 to 5 | Pinheads forming across surface | Maintain misting 2x/day, fan gently |
| Week 5 to 6 | First flush ready to harvest | Harvest before veil tears, clean substrate |
| Week 7 to 8 | Second flush pins forming after rest period | Resume misting after 5-7 day rest |
| Week 9+ | Third flush or end of bag life | Harvest final flush or compost spent substrate |
If you're reading this and you're already partway through the process, just find where you are in that table and pick up from there. The most common mistake is jumping ahead, especially opening the bag before it's fully colonized or skipping the rest period between flushes. Both cut your yield significantly. If you're interested in how other all-in-one grow bags compare in terms of setup steps and timelines, Both cut your yield significantly. If you're interested in how other all-in-one grow bags compare in terms of setup steps and timelines, our guides on all-in-one mushroom grow bag instructions and both in terms of setup steps and timelines, our guides on all-in-one mushroom grow bag instructions and North Spore grow bag instructions cover similar formats with some useful differences in fruiting chamber setup. blooming acres grow bag instructions cover similar formats with some useful differences in fruiting chamber setup. blooming acres grow bag instructions blooming acres grow bag instructions
The Spore Sorcery bag is a solid beginner kit. The built-in injection port removes a lot of the risk from inoculation, and the all-in-one grain-plus-substrate design means you skip several intermediate steps that trip people up on more advanced setups. Follow the temperature and moisture targets, be patient during colonization, and don't overthink the fruiting stage. Most grows that fail do so because someone got impatient and interfered too early.
FAQ
My bag looks partially colonized, when should I stop incubation and start fruiting?
If your bag has no visible tan or white grain/substrate but the inside is not uniformly colonized (patchy white, or mostly brown), it is not “done” yet. Wait for the bag to reach 95 to 100% uniform whiteness before switching to fruiting, even if the surface looks close. Premature opening is one of the biggest yield killers.
Can I speed up colonization by keeping the grow bag warmer or using direct sunlight?
No. Even in incubation, keep the bag at room temperature targets and do not place it where it can warm above your range due to sunlight or nearby heating equipment. If you overshoot, colonization can stall or the bag can become uneven, which makes fruiting less predictable.
Do I need to tape or seal the injection port after inoculating?
The injection port is designed to self-seal, so you generally should not tape over it. However, if you accidentally dislodged the port or it no longer appears intact, do not continue. Plan to discard and avoid additional injections, because a compromised seal increases contamination risk.
If nothing happens after inoculation, can I just inject again and try the same syringe?
Re-using the same syringe is risky. If you suspect a failed inoculation, use a fresh spore syringe that has been stored and shipped properly. Also avoid moving the bag immediately after the second injection, keep conditions stable, and do not open it for “checking” until you see clear colonization.
During fruiting, is it okay to pour water onto the surface to improve humidity?
After you open for fruiting, you should not add water directly onto the substrate surface. Instead, mist the exposed surface lightly and evenly, then mist the inside of the opening walls. Direct pouring creates pools that can encourage bacterial contamination and uneven pinning.
What should I do if I see water pooling on the substrate during fruiting?
When misting causes pooling, reduce the amount per session and the frequency. A practical rule, if the surface stays wet-looking or water gathers at the base, you are doing too much. If needed, gently tilt the bag briefly toward the filter area to drain, then return to normal positioning.
Is a bright windowsill enough light, or will it cause overheating and early pinning?
Use ambient daylight, not sunbeams. Indirect light is enough for directional cues. If the surface gets warm or you see the bag heating up from a window, move it to a cooler spot with similar indirect light.
What if my home is very dry and the surface keeps cracking?
Yes, relative humidity affects the “feel” of misting. If your room is very dry, you may need slightly more frequent misting, but do it gradually, and still avoid soaking. If you use a nearby humidity bin, keep it open enough for fresh air exchange during fruiting.
How do I fix long, thin mushrooms with small caps without over-misting?
CO2 buildup is best corrected by fresh air exchange, not by increasing misting. Fan gently and more often, and ensure the opening is covered as a dust cover, not sealed airtight. If stretching continues, check that you are not over-wetting (which can also reduce performance) and confirm you are at fruiting temperatures.
What does it mean if I only see mycelium near the injection points?
Small patchy growth can be normal early, especially right around injection points. The key is the progression toward uniform whiteness. If after the expected window (around day 5 to 7 you should see patches, and by weeks it should expand) you do not see meaningful expansion, troubleshoot temperature and syringe viability before adding any additional inoculations.
Is it ever worth isolating a small contamination spot instead of discarding the bag?
Yes. If the contamination is localized and clearly not spreading, some growers attempt to isolate, but the tradeoff is that it can still release contaminants into your environment. If you decide to isolate, isolate it away from other bags and do not open it more than necessary.
After harvesting, how do I handle leftover stems so the next flush doesn’t fail?
When you cut or harvest, avoid leaving stems or broken pieces behind, because rot can accelerate contamination and also reduce the next flush. If you notice tiny stubs after harvest, remove them promptly before the next rest period.
Can I harvest some mushrooms early and let the rest keep developing, or should I harvest everything at once?
You can harvest in waves, but do not wait until veils fully tear across the whole bag. Pick mushrooms as the veil stage indicates they are ready, then keep misting and fresh air exchange consistent. Leaving already-mature fruits to drop spores can reduce overall quality and may slow the next pin cycle.
How strict is the 5 to 7 day rest period between flushes?
A good rest window is part of the flush schedule. If you skip or shorten rest, you often see weaker second flush yields and slower pinning. Keep the bag at the cooler rest temperature and resume your regular misting and fanning routine afterward.
Can I keep using the bag after the third flush if it still produces a little?
Most bags should be fully “spent” after the third flush or when performance drops and the substrate looks dark or shrunken, but if the third flush still produces a reasonable amount, you can continue until yields clearly fade. Do not keep rehydrating repeatedly, rely on the normal rest-and-fruit cycle.